Thursday, November 30, 2006

yummy yum yum!


I thought I would share a yummy recipe with you today. For Thanksgiving I brought caramel corn. The guests couldn't stop eating it and the hostess had to keep the few leftovers b/c she liked it so much! It really is quite delicious!

CARAMEL CORN

Ingredients:
8-9 quarts popped popcorn (I pop it on the stove)
2 sticks margarine
2 cups brown sugar
1/2 cup light Karo Syrup
1/2 teaspoon salt
1 teaspoon vanilla
1 teaspoon baking soda

Boil sugar, syrup, vanilla and salt for 5 min. Then add 1 tsp baking soda (it will foam) Quickly pour over popped corn. Bake on flat cookie sheets (I used 9x13 baking dishes) for 1 hr at 200 degrees, stirring corn every 15 to 20 minutes.

Saturday, November 25, 2006

glass etching


For Christmas I am giving my mom a set of 4 plates etched with lighthouses from Coast to Coast. When I saw what people were making etching glass I knew it was a technique I wanted to try. I have to tell you it isn't extremely hard, but it does take some patience. I could give you step by step directions on how I made the plates, but the best instructions I have seen are in a tutorial by Vickie Maduzia on Splitcoast. This tutorial ROCKS!!!! Check it out here.

Here are some tips that I found out along the way...
--Make sure you like the image in versamark before you emboss it. On one of the plates I wiped the plate and reapplied the windex about 3 times before I was satisfied with the image. Let me tell you picking off the image after you emboss it ISN'T fun...(don't ask me how I know ;) )
--Words stamp backwards. You are stamping on the backside of the plate so check for any words. I didn't ink up the words on my stamps and on the ones that I couldn't not ink that part I used a dry aquapainter to take the embossing powder off that section before heating.
--Etching cream is very powerful and potent and gloves are supposed to be worn when using it. However I found that I was very clumsy with the gloves on and had too many etching cream "accidents" with them on. I couldn't feel the cream on my gloved fingers and I smeared it on things. For example I got some on one plate on accident and etched a little part on the edge. I found it was better for me to just be REALLY careful and leave the gloves off.
--Just a reminder BE CAREFUL-- that cream is powerful and will start working on whatever it touches. You only want to etch glass not the whole area you are working at. ;)

I used Coast to Coast to match a set of coasters I made my parents. Aimee also etched using this set. Thanks Aimee--I knew I could use Coast to Coast and have it look great by seeing what you had done! See Aimee's blog

Wednesday, November 22, 2006

7 Gypsies Bracelets


I finally got a chance to borrow a camera and take pictures of a few of the projects I have been working on. I will share more in the coming week because I have been working on a LOT of projects! (If you are family and you secretly read my blog you might want to give me a heads up so I don't share your Christmas gift on here ;) )
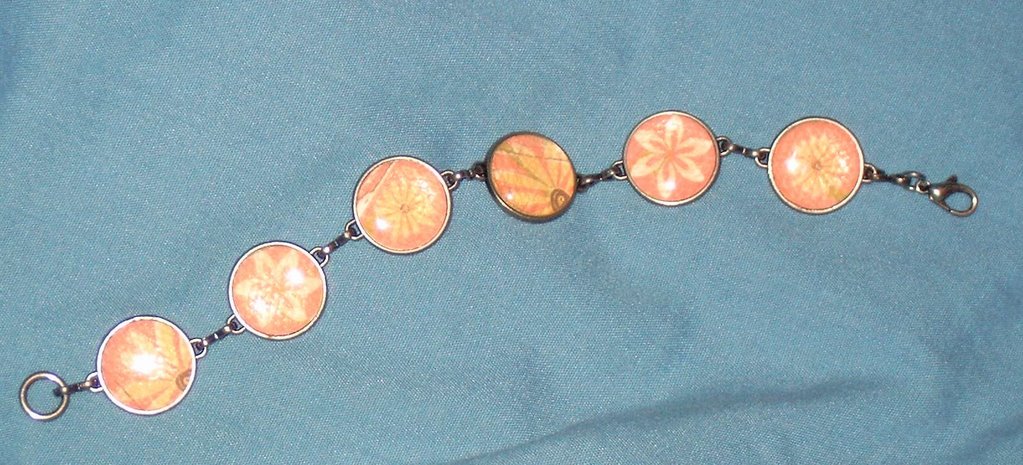
This is my 7 Gypsies bracelet. I made this one for myself and I have gotten a lot of comments on it. The paper I used is Crate paper-It is called "Dress up" from the Twirl Collection.
The bracelet comes in a kit. It comes with most of what you need including the bracelet clasps. Besides the kit you need your choice of patterned paper or pictures, Crystal Effects, circle punch, and something to squeeze the links shut.
Step 1: Punch the paper you want with a 5/8" circle punch.
Step 2: Adhere paper to the bezels with Crystal Effects. Only a tiny dot will hold it down just fine without having any squeeze out.
Step 3: Place Clear circle epoxy stickers on the paper you glued down
Step 4: Put the bracelet together by squeezing the links shut with a long flat nose pliers (or whatever it is called)
You might want to measure your wrist before using all of the bezels. The kit comes with 8, but my wrist only needed 6. You can also use extra links in between bezels if your wrist is just a little bigger than a certain size.

Friday, November 10, 2006

How Beauty is made

How Beauty is Made

This is a video that all girls and women need to see!
This is for all the girls out there who have ever compared themselves to a magazine picture and felt they came up short....For anyone who thinks they aren't good enough because they don't look like what they see on tv. This video is part of the Dove beauty campaign.

No Stamping this week.

I feel like I should be posting a new card or creation, but I haven't had the time to stamp this week. I did make a couple 7 gypsies bracelets, but they are Christmas gifts so I can't post them yet. One of my brothers is coming here to visit me for the weekend so I had to clean up and put away my stamping stuff. I have to admit I am a very messy stamper and it took me a while to clean so I can't take my stuff back out until after he is gone... :( So I might upload a couple of pictures or something fun, but don't look for new cards until early next week.

Saturday, November 04, 2006

White Castle


I got this picture in an e-mail from my brother this week. The caption on this picture reads "Just when you thought you'd seen it all Chicago (South Side) Wedding Reception"
I had to laugh. If you know anything about White Castle you would giggle too. I don't know if they have White Castles outside the midwest yet, but it is a place where you get square hamburgers called "slyders" which are greasy, stinky (they have their own unique odor), and yet absolutely yummy! They slide right down and often slide back up in the form of a big smelly burp! These sliders gross some people out, but for me the restaurant has some good memories. I have to say every once in a while I get a craving for a sack of slyders and all my family to eat them with.
yummy!

Friday, November 03, 2006

2006 Christmas Card Sample #1


Thank you so much to all of you who gave me your opinions for my Christmas card! (If you still have ideas be sure to leave a comment and tell me!) I spent all morning trying out the different ideas you left and seeing what would work. This is the first sample that I came up with. The final card size is 5x7. I started with the big snowflake in the right top corner because I knew I had more room there to do a cut away snowflake. I then just randomly stamped the snowflakes around the edge of the vanilla cardstock. I used my paper cutter to eyeball and cut a rectangle out of the vanilla leaving room to cut around the big snowflake. After it was all done I decided the card needed some sponging around the edges. The card base is Certainly Celery.
I love these colors for a non-traditional kind of Christmas card. I had the picture printed up in Sepia tones also and I think I will make that card a little more elegant for the relatives who would go into shock seeing a Christmas card in these colors. ;)
stamps: Snowflakes
paper: Very Vanilla, Certainly Celery
ink: Certainly Celery, Cool Caribbean, Regal Rose
other: ribbon, jewel (from Target $1 spot), and sponge

LinkWithin

Related Posts with Thumbnails