Friday, September 29, 2006

Big Buckle


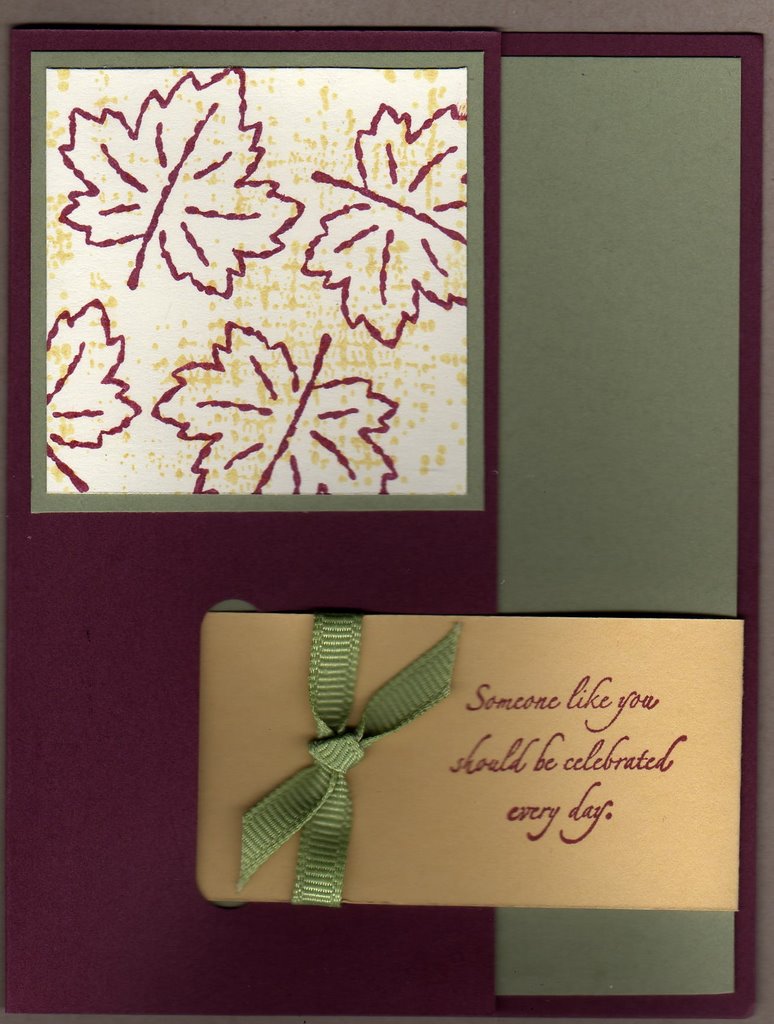
This is my card for the shoebox swap for Southern California MiniMania tomorrow. It is called a buckle card because the So Saffron layer "buckles" the card by going through the hole made by the word window punch. These cards are easy to make and fun to look at! I could give a tutorial on how to make them, but there is already a really cool tutorial by Beate at Splitcoaststampers--http://www.splitcoaststampers.com/resources/bucklecard.php
This card used the color challenge from this week--So Saffron, Bravo Burgundy, and Mellow Moss. This color combo is perfect for a fall card!
The leaf layer has a background made with the rough texture jumbo wheel in So Saffron. The Leaf stamp is from Tags and More and is stamped with Cranberry Crisp. The set has been around for a while, but I still use it often! It is a great set to get if you wanted images for different occasions. It has the leaf, candles, a dragonfly, a snowman, 2 stamps with flowers, a bunny, and a stamp that says "Just for you to:______ from:_______" The title of the set "Tags and More" is so true. They make great tags, but the stamps are also great for cards and other projects also.
stamps: Tags and More, It's Your Birthday, Rough Texture Wheel
paper: Bravo Burgundy, So Saffron, Mellow Moss
ink: Cranberry Crisp, So Saffron
other: ribbon

Monday, September 25, 2006

Do you know the most famous reindeer of all?


"Ruldolph the red nosed reindeer, had a very shiny nose.." Oh sorry ;) I made this card for a technique challenge on Splitcoast (TLC83) It is called a waterfall card. TLC83 - Waterfalls for fall - Splitcoaststampers Click on the link for details about the challenge and a link to the tutorial on how to make one. My card is a little different than most waterfall cards because the panels are rectangles and I only made 3 of them instead of 4. I have had so much fun making cards with these little reindeer!

Simple and Sweet


Some people can load a card with cardstock, ribbon, buttons, brads, and punches and even more make a really cute card. That isn't me. I try to make a card with a lot of stuff on it and it looks like a little kid's work of art (you know how little kids will have a pretty painting and then decide to just mix the colors right on top and "ruin" the picture?) I come from more of the simple is better philosophy. (Although I have been known to look at a card and say what would Jami or Taylor add to this ;) ) This card I am sharing with you all today is a LOT more simple than I would normally make, but it was a make and take for a class/workshop where the customers (who were mostly beginners) made 4 projects so I needed to keep them really simple. The other projects were more involved and used ribbon, paper piercing, tearing, etc, but this one was just kind of plain looking. They LOVED this card!
Paper: Cool Caribbean, Real Red, Whisper White
Ink: Cool Caribbean, Real Red, Certainly Celery, Summer Sun (Real Red Marker also)
Stamps: Seeing Spots

Saturday, September 16, 2006

Sneak Peak


Here is a sneak peak at one of the cards my customers will get to make at my Christmas card class. I CASEd this layout from the cover of the Holiday mini. I changed the colors and the Santa stamp. This Santa is from Holiday Tag Team

Thursday, September 14, 2006

Faux shaving cream


I tried a new technique for this card. The technique is called faux shaving cream. This technique gives the look of the shaving cream technique without all of the mess. The first step is to pick out a solid stamp for the image and a wheel that doesn't have solid images on it. I picked the rectangle from Simple Shapes for the solid image and the Blossoms and Bugs wheel. The next step is to pick colors. The best combos are light and dark shades of the same colors. I used Cool Caribbean and Tempting Turquoise. You want to ink the solid image with the lighter color (Cool Caribbean). Next ink the wheel with the darker color (Tempting Turquoise). The next step is a little hard to explain. You want to roll the wheel onto the solid image in kind of a zig zag pattern so it doesn't leave the exact image of the wheel, but kind of a smudge or swirled version. Stamp the image on paper and you have a faux shaving cream image. I did this technique on the rectangle and also the flower although the flower doesn't show it as well.
stamps: Simple Shapes, Seeing Spots, Warmest Regards, Canvas
paper: Tempting Turquoise, Cool Caribbean, Chocolate Chip, Whisper White
ink: Tempting Turquoise, Cool Caribbean, Chocolate Chip
other: brads, DMC floss, pop dots (for the sentiment)

Wednesday, September 13, 2006

Challenge


Challenges. I love a good challenge. I think challenges of all kinds spur us on to achieve things we didn't think we could do. When it comes to cards, Splitcoast challenges can't be beat. They have color challenges, sketch challenges, and technique challenges just to name a few. The challenges dare you to think outside the box and try new things. Today I tried the new sketch challenge for the week. http://www.splitcoaststampers.com/forums/showthread.php?t=182932 I had to turn the sketch on its side so it would work with my reindeer, but I think it turned out cute!
I used a sponge dauber to ink the main image layer with Creamy Caramel. The reindeer were colored with ink and a blender pen.
The sentiment is hard to read in the scan, but it says "wishing you many magical moments this holiday season!"
stamps: Weathered, Festive Favorites
Paper: Very Vanilla, Crisp Cranberry, True Thyme, Holiday Thyme designer paper
Ink: Black, creamy caramel, Crisp Cranberry, Chocolate Chip
other: gel pen, mat pack, sponge dauber

Monday, September 11, 2006

Christmas


Here is my first Christmas card of the season! It is just a simple card to get my creative juices flowing again. I used Festive Favorites and Warmest Regards (both SU!) for this card and the new Holiday Thyme designer paper from the Holiday Mini. This holiday paper is a MUST HAVE! cardstock is Kraft and Old Olive. I watercolored the the reindeer with creamy caramel to give them a little dimension. Thanks for looking.

Sunday, September 10, 2006

Do you ever have those weeks where you just don't feel very creative? I was sick this past week--physically sick and homesick and I just wasn't in a card making mood. Usually stamping cheers me up, but not this week. I tried to make a few cards, but those few attempts landed in the garbage can after WAY too much time trying to make them work! On Friday I got my Holiday Thyme paper and Festive Favorites set. Hopefully this week will be better and I will be able to create some fun Christmasy cards. So look for a post with new cards coming soon...

Wednesday, September 06, 2006

Labor Day weekend


This weekend my parents flew in to visit me. What a fun time we had! Here is a picture I took of them at the beach.

Friday, September 01, 2006

Does this look familiar?


Does this card look familiar? It is on page 82 of the Stampin' Up! Catalog and Idea Book. You might ask why I am showcasing a card that I copied and didn't think up myself. Well, this week I was challenged to go through the catalog and find one card and copy it exactly and find another card and copy the layout and change the stamp set and colors. I found it quite fun to do this challenge. I had never gone through the catalog looking at the layouts so closely. I found a lot of fun designs that I would like to try. I guess the point of all of this is to show you it is okay to find inspiration from what others have already created. Don't use the excuse "I am not creative," to put off stamping! Start with a card you like and CASE (Copy and Share Everything) it. As you stamp more you will be able to take different pieces and aspects of cards you like and make them into your own creations. So stop making excuses and STAMP!
(If this blog post inspired you to make a card please e-mail me a picture so I can see it!)
PS--if you are looking in the catalog for ideas and can't figure out how something is made or what supplies are used there are recipes in the back to make it easy to look it up.

LinkWithin

Related Posts with Thumbnails