Tuesday, December 28, 2010

Birthday and Thank You cards

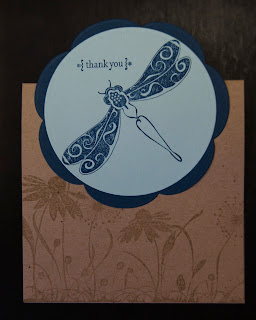
I made a set of cards for my SIL for Christmas.  She wanted cards for all occasions.  Here are two of the cards that went into the set.

I used stamps from Taylored Expressions for both of these cards.  The candles in this card are from the set For the Love of Cupcakes.  I am not sure what stamp set the sentiment comes from, but I am pretty sure it is from the same company.

The Dragonfly and flowers in this card come from Discover your Wings  The design for this card comes from my friend Jami.  She made a set of cards like this with different colors for her niece.


Sunday, December 26, 2010

Merry Christmas!

I hope you all had a Merry Christmas yesterday.  I was far away from family in terms of physical location, but that didn't stop me from joining in on the festivities.   I am so thankful for SKYPE.  My family had "me" on a laptop and moved the laptop to let me see everyone open their gifts.  It felt like I was there with them.  They even took a family picture with me in it!

Does anyone else use SKYPE to talk to family or friends?  I think it is one of the best inventions ever (and it is free)!

Wednesday, December 22, 2010

Book Review: Under the Overpass by Mike Yankoski

I had the wonderful opportunity to choose a book to read and review.  I chose Under the Overpass by Mike Yankoski.

I debated reading this book because I knew it would be challenging to read...not challenging in an educational way, but spiritually challenging. I knew going in that I wouldn't be able to just read this book and quickly move on. I was right, but I am so glad that I made the choice to be challenged.

The book is about two college students who decided to challenge themselves to live out their faith by becoming homeless for 5 months in 6 different cities. The author, Mike, realized it was easy to claim Christ as his everything, but he had never had to put that claim to the test while living his middle class life and attending a Christian college. He decided to really live out his faith and step out in a radical way.  Mike shares his experiences, thoughts, and emotions of those 5 months Sam and he lived on the streets. I love the deepness and honesty of this book through the laughter and tears, the good and downright awful, the beautiful,ugly and sometimes very stinky.

Don't read this book unless you are willing to be changed, willing to DO something whether what you do to live out your faith has to do with homelessness or not.  If you are willing to do that, then this is a must read. :)

If you are interested you can download the first chapter of the book to check it out.
I received this book for free from WaterBrook Multnomah Publishing Group for this review. The review is my honest opinion of the book.

Sunday, December 19, 2010

Best Toffee Ever

I decided to make a few batches of toffee for my tenants at the apartments as a way to say "Merry Christmas." The recipe is adapted from allrecipes.com.  I really like the recipes on that site and this one called, Best Toffee Ever, was definitely a winner!  My changes to the recipe and comments are in italics

For this recipe you need:


2 cups butter (My dad recently taught me that you get unsalted for baking and then you add your own salt and this keeps the recipe consistent--thanks dad!)
2 cups white sugar
1/4 teaspoon salt
2 cups semisweet chocolate chips (I used 1 1/2 cups)
1 cup finely chopped almonds (for me 1/2 cup was plenty)

Directions:
1.In a large heavy bottomed saucepan, combine the butter, sugar and salt.  Cook over medium heat, stirring until the butter is melted. (For the 2nd batch I partially melted the butter before adding the sugar and salt and liked how that worked) Allow to come to a boil, and cook until the mixture becomes a dark amber color, and the temperature has reached 285 degrees F (137 degrees C). Stir occasionally.
2.While the toffee is cooking, cover a large baking sheet with aluminum foil or parchment paper.


3.As soon as the toffee reaches the proper temperature, pour it out onto the prepared baking sheet. Sprinkle the chocolate over the top, and let it set for a minute or two to soften. Spread the chocolate into a thin even layer once it is melted. Sprinkle the nuts over the chocolate, and press in slightly. Putting a plastic bag over your hand will minimize the mess.

4.Place the toffee in the refrigerator to chill until set. Break into pieces, and store in an airtight container.


Package up and you are ready to go!

Saturday, November 06, 2010

A Card Maker's Confession

     I love making my own cards.  I haven't had the chance to stamp as often as I would like in the past few years, but if given a choice I would much rather send a homemade birthday card to someone than send a store bought one.  However, this does not apply to Christmas cards.  I have tried to make all of my own Christmas cards, but there are just too many to make...and then pictures and a letter to print out...I get stressed out and end up not sending out any.  Solution?   Shutterfly!  Shutterfly has a great selection of holiday cards in many different styles.  I love the ease of just choosing a design and adding my choice of picture(s) to it! Click here to check out their Holiday Photo card selection.
 I think my favorite card design is "Simple Memories."  Those of you who know me know that I love my cards simple and to the point :)  I like that the card fits 4 different photos on it.


They also have designs available where you can print your Christmas letter right on the card.  Seeing as my printer always seems to have issues when I NEED to get something done, it would be really nice to have the letter right on the card--no extra printing needed!

Or if simple is more your thing, this card  leaves 9 spots for short sentences to share what happened throughout the year. If I can think of nine sentences I might use this one!

If you aren't into cards they also have different photo calendars. I haven't gotten a calendar yet because I just think that photo calendars are much cuter when you have kids. :)

So head on over to Shutterfly and then come back and tell me which design you like.


Disclaimer:  I wrote this post as a part of the Shutterfly Holiday Card promotion and will receive free holiday cards, but all opinions are my own.  I only promote products/companies that I like and trust.

Wednesday, September 29, 2010

Saving Money

I have a lot of time on my hands lately and not a lot of cash so I have been doing what I can to save money and still buy the things I need.  A few friends and family members have been asking me to share a  money saving tips/how to get free stuff!

1.  Swagbucks
Swagbucks is a search engine that gives you swagbucks (points) just for searching.  You can redeem those swagbucks for prizes or gift cards.  I think that the amazon gift card is the best deal--$5 gift card for 450 swagbucks.  I have redeemed two of these gift cards so far since signing up--which comes in handy since I am involved in a book club and get the books from amazon.  If you sign up don't get frustrated if you aren't earning a lot of swagbucks right away.  Just use the site like you would google and slowly you will see things adding up--it really does work!   Click here to check out Swagbucks and sign up.

2. Before I go shopping or out to eat I do an online search (usually through swagbucks :) ) to see if where I am going is offering any deals or has coupons available.  Yesterday I decided to use a gift card I had from Bath and Body Works so I went and checked (just put in a search for "Bath and Body Works coupons") and found a coupon for a free travel size lotion with any purchase.  I was going to make a purchase anyways so for me it was a great deal!

3.Ebates
This site is great if you do a lot of online shopping.  You get a percentage back for shopping online--% varies by store. They also share deals/coupons that the stores have for online shopping.  Plus you get a $5 sign up bonus when you make your first purchase.  I don't do a ton of online shopping so for me earning money on this site has been slow going, but I still think it is worth it.  I have heard of many people who love it and earn quite a bit through ebates. With Christmas coming up it might be useful.  Click here to check it out.

4. Coupons--Matching coupons to sale prices and deals is a great way to save money or get free items. You don't even need to get the Sunday Paper coupons to score deals, although that is helpful.  I get most of my coupons online.  I don't have time to search out all the good deals so I depend on others to do that. :)  Here are a few websites I like  She SavedCoupon Geek   and   Penny Pinchin' Mom   (If you are interested let me know and I can share a few more websites/blogs like these.)  I don't think any of these ladies live in my area, but I still have gotten some great deals by reading their blogs and ones like them...including the free full size bottle of shampoo that I got yesterday :)

Hope this helps. :)

Monday, September 27, 2010

Sweet Things Challenge

A few Saturdays ago I got to spend an afternoon stamping and laughing with a few very talented stampers. I had never met two of the ladies before that day, but left with two new friends.  One of the reasons I like stamping with others is you get to borrow their supplies and try them out! :)  While using each other's stamps Jami decided we should have a card challenge. We all had to use the same image on a card to see what we could come up with.  We agreed to use Sweet Thing by Penny Black...love this cute little girl with her cupcake! 

I tried to challenge myself even more by trying out Taylored Expressions sketch challenge for this card. 
Here is what I came up with.

Check out what everyone else did:

a few pictures from the day:

stamps: Sweet Thing by Penny Black, Make a Wish by Taylored Expresssions
paper: cardstock-Stampin' Up!, Designer paper--Crate
other: Prisma Colored Pencils, odorless mineral spirits, Ribbon--My Mind's Eye, brads from Target $ spot

Friday, June 11, 2010

Baby Boy--Tie Onesie

    I have been working on a gift basket for my friend who is having a baby shower tomorrow.  She is having a boy. I think that baby girl things are so much easier than baby boy things.  No pink, no ruffles, no bows....what to do?!?!   I have seen cute tie onesies for boys lately so I decided to give one a try.  I ironed wonder-under on the fabric I was using and then just hand drew my tie onto the back of the wonder-under before cutting it out.  I made 2 parts, one is the "knot" and the other the tie hanging down.  After you have the tie cut out you just peel the backing off the wonder-under and iron the tie on to the onesie--so easy!  I then sewed around the edge of the tie to keep it stuck to the onesie.
    I have heard good things about the wonder-under, but I have to say I wasn't impressed.  I found it hard to get the backing off and then I had trouble getting it to stick when I ironed it.  The project turned out fine, I just wasn't impressed with the stuff.  Maybe I did something wrong??

   I can't wait to give this to the mom-to-be!

Click to see blog parties I link to

Thursday, June 10, 2010

With Love to Mom--Part 2--Table Runner

I promised a picture of the table runner I made my mom.  Click here to see Part 1 where I shared the place mats and history of the fabric/project.
Here is a picture of one of the quilt squares I used for this project.

And the finished table runner...(My table is shorter than my mom's so it will look a little better).


And one last picture of the table runner and place mats. (yikes, someone should really use the iron on projects before taking pictures!)


Click here to see parties I sometimes link to.

Monday, June 07, 2010

A student wrote this last week in her journal while I was subbing.  I will just ignore the fact that she wrote basically the same things about her friend the day before. ;)

Can you see that I am totally rocking the purple braids in that picture?!?!

Sunday, May 23, 2010

Something Special Sunday--pin cushion

I love this little pin cushion one of my sister-in-laws made for me.  She gave it to me a few years ago for Christmas, but it was sitting begging me to take its picture the other day while I was sewing.  I love well thought out gifts and I use this one all the time.

Thursday, May 20, 2010

With Love to Mom--place mats

Here is a little sneak peak to part of my mom's birthday gift.  I haven't mailed the gift yet so hopefully she doesn't come on here, but she knows I can't keep a secret so she will understand. :)
When I was in college I decided I was going to make a quilt.  I bought all the cloth and slowly started cutting squares.  Well, 6 years later, my fabric container had 3 finished squares and a bunch of uncut fabric from that quilt.  I decided that I was never going to finish the quilt and tried to think about how I could use the fabric.   The colors of the fabric are a perfect match to my mom's dining room and style so I decided to make her a table runner using the finished squares and extra cloth. Then I made 4 place mats to match the runner.

Today I am only sharing the place mats. I am hoping to have a post with the whole set in a few days.  It is just so hard to photograph!

These are very simple to make.
1. Cut 2 pieces 20" x 14.5"  (I used 2 different colors, but you don't have to)
2. Cut piece of batting also 20" x 14.5"
3. Pin the layers--batting on the bottom, fabric #1 facing right side up, and fabric #2 facing right side down.
4. Sew with 3/8" seam.  Be sure to leave a few inches not sewn so you can turn the fabric right side out.
5. Turn the place mats right side out.
6.  Iron
7.  Topstitch around at about 1/8" (this closes the few inches you left open before).
8.  I also topstitched a second line about an inch in.


Click HERE to see great blog parties I link to.

Monday, May 03, 2010

No pattern brown shirt


A few weeks ago I tried out making my own shirt (not upcycling) from knit fabric.  I didn't take pictures along the way, because I was experimenting and ended up doing a bunch of seam ripping along the way.   I didn't use a pattern, I just took a shirt that fits me well and laid it on the fabric and used it as a pattern.   Most of the shirt went smoothly, but the neck was supposed to be gathered and that caused a little bit of trouble.  I think I ripped the seams out of the neckline 2 times if not 3.   But now I am very happy with it and proud of myself for sticking with it!

This picture makes the shirt look pretty plain, but I really like how it turned out.

Trying to get a shot of the little bit of gathering (it has separate gathering at the front, on both sleeves, and the back)

Click HERE to see blog parties I link to.

Sunday, May 02, 2010

Halfway with nothing to show

I have been working on a bunch of projects all at the same time, but I have nothing to show for it yet.  A few of the things I finished are gifts and will have to wait for sharing and the others are all half finished :)   I can show you one of the projects I am in the middle of...

A friend gave me this table with 4 chairs saying she had seen my office chair makeover and knew I could give the table and chairs the little bit of love they needed to fix them up.  The white on the table is the backing of a table cloth.  The table was stored in a garage and I think the heat made the varnish sticky (very sticky, let me tell you!) and the table cloth stuck to it.  I spent most of yesterday trying to get the varnish off the top.

I will share more later when I am finished--the plan is to leave the top looking like wood and paint the legs black.  I have seen this look more and more recently and I love it.

After working on the table all day I treated myself to an Italian Beef Sandwhich from Portillos--Yum!   This is a Chicago based chain, but I heard that the owner vacationed to CA, and loved it here so he built a Portillo's out here too.  I don't know if that is true, but I am so glad I can get my fill of Italian beef without having to fly to Chicago every time. :)

Sunday, April 25, 2010

A look back at my very first tutorial

I was perusing blogs this weekend when I came across this blog.  The blog first of all caught my eye because the blog is having a giveaway (check it out!), but I also really like that the blogger has a feature called "Sunday Favorites," where every Sunday she posts an old blog post of her own that she likes.  What a fun idea!  I have so many posts that I look back and laugh at or have forgotten I even wrote.   I decided to join in and share this blog post from November of 2008--my very first tutorial.  I know you can hardly call it a tutorial, but I was so proud of myself when I wrote it. :)


Cowgirl Carrie and a Tutorial
A few weekends ago I went out with a group of friends and did some country line dancing...well I attempted to anyways. I think that the only dance I am good at is the electric slide, which actually goes well with quite a few country songs! I don't know what part of the brain makes a person able to pick up dance moves, but mine is underdeveloped whatever it is. I can follow along if I watch long enough, but if I am next to a person who is dancing fancy moves it messes me up for the whole song--so I spent quite a few songs on the sidelines trying to figure out the moves. It was a blast though!

When looking through the Rubber Romance stamps at eP I saw a great cowgirl named "Carrie" that I knew would be perfect for cards for my country loving friends. So here is what I came up with.

This card was pretty easy to make, but took quite a bit of time. I know the picture really doesn't show it, but the shirt, arm, cowboy hat, and boots are all paper pieced on. To make the wall I masked Carrie,sponged So Saffron and stamped Weathered. I sponged the floor and drew in hard wood flooring.

The photo corners are a fun little addition and very easy to make. Since I am borrowing a friend's camera for the day I thought I would do my first tutorial to show you how to make them. (click on any "how to" picture to enlarge)

Photo Corner Tutorial
Step 1: Cut a piece of cardstock 2" x 2"

Step 2: Cut the square piece in half from corner to corner. This gives you the two pieces that will be your two photo corners.

Step 3: Take corner A and fold it to meet corner C.

Step 4: Take corner B and fold it to meet corner C.

Step 5: Take your scissors to cut across from corner to corner (you will cut off corners A, B, and C by doing this)

Step 6: Flip pieces over and wrap around any corner.


Linking to Sunday Favorites at Happy to Design

Saturday, April 24, 2010

Snuggly Baby Blanket

     It seems to be baby season again so I have been making many baby shower gifts.  Here is a simple baby blanket 36 x 36 (well mine is 34 x 36 because of a stubborn corner that wouldn't lay right, long, frustrating story :) ).  I wanted the blanket to be 2 layers, but I thought that living in CA two layers of flannel might be too much, so I went with flannel and cotton.   The animal side is flannel and the blue polka dots side is cotton.  A couple of burp rags to match will be coming soon. :)

     To make this blanket all you need to do is measure out 2 pieces of cloth 36" x 36"   Lay them RIGHT sides together and sew around the outside with a 5/8 in seam.  Sew all but about 4" so that you can flip the blanket right side out.  After you flip the blanket you sew the 4" gap and keep going all around the outside and about 3/8".  

My problem came in because the flannel was stretchy and the cotton wasn't--so if you use 2 different fabrics be sure they match up perfectly and use a lot of pins to hold it. :)

Click here to see blog parties I link to.

Monday, April 12, 2010

Going Green--Reusable grocery shopping bag


     I feel a little bit guilty every time I get home from the grocery store and empty my pile plastic grocery bags and add them to my stash.   I do reuse those bags for other things, but I have a lot of them and I don't need them all.  I started out recently by asking for no bags for things I can carry--like if I am only getting a few items at a store or with gallons of milk.   A few weeks ago one of my SIL showed me this tutorial that was perfect for me and my many extra bags issue. :)  ---Reusable shopping totes made from sheets.  I didn't follow the tutorial all the way, but used it as a guide.

     I didn't have any old sheets lying around so when I was at the thrift center I browsed the linen section and found a flat sheet that I fell in love with!  I don't know the size, but it is bigger than a twin so I think that I can get 3 or 4 bags from one sheet.


I threw a book and a few stamps sets in to show how roomy it is.  If you click to enlarge, please ignore all the threads hanging--I was so excited to take pictures I didn't stop to cut them all first! 

 I realized how useful it is when I threw a bunch of envelopes in it to go mail them at the post office and I decided it makes a nice regular tote too. :)

Click here to see where I linked.

Sunday, April 11, 2010

Wild Animal Park Pics

I gave myself a mini-vacation this week and headed to San Diego to spend some time with friends and head to the Wild Animal Park.  What a relaxing and fun time.   Here are a few pics.  All taken with my Canon Powershot. :)    

This baby elephant was just born in February.  So cute!

The Park has a special butterfly exhibit going on.  The line was long to get it, but it was worth it!

This last one is my favorite.

Thursday, April 08, 2010

Layered skirt made from t-shirts

I went to the thrift store the other day hoping for some deals.  This store is my least favorite thrift store, but they have good sales at times.  The sale for that day was 20 articles of clothing (without lines on their tags) for $5.50.  Pretty sweet deal...except that it didn't take me long to realize that most of the clothes I would want had lines on them and therefore were not on sale.  I did however find some clothes that I have big plans for repurposing!  Here is the first one.  I made it for me, but it would be so easy to make a kids version.

I don't have a before picture, but this skirt was 2 red shirts with a logo on the front pocket area and high on the back so I had to work around these areas.  The first shirt I cut to make the main skirt and the second shirt I cut into 4" strips and sewed on the main skirt (no hemming or serging on the layers).   The picture is from before I washed it.  After it was washed the layers curled a bit giving a new cool look.  I will try to get a picture of that soon.
I got the idea for this skirt at Make it and Love it.

eta: here is what is looks like after being washed.


Click here to see parties I link to.

Monday, April 05, 2010

Chair makeover

When I first moved to California I drove here in a car with all of my stuff.  Whatever didn't fit in the car, didn't come.  So, needless to say, I did not come with any furniture.  After my dad and I moved all of the boxes into my new place we went to sit down only to discover that there was nothing to sit on besides the floor!  That day we went thrift store shopping and I came home with my first piece of furniture...this chair.

 Pretty?  No it is not.  But it has sentimental value (and is comfy) so I have kept it.
I decided it was time to fix up the chair and "pretty it up" to match the room it is in.  I sanded it and gave it a good paint job (to match the desk I use it with) and recovered the seat with upholstery fabric.  I think it looks much better after its makeover.  What do you think?

Here are a few "in between shots"


Linked to:
The DIY Showoff


Metamorphosis Mondays

and sorry I forgot this one before:

LinkWithin

Related Posts with Thumbnails